You already know that StumbleUpon is closed, and moved to Mix.com!
Most of the people asking me about how to add mix share button to their WordPress blog or website. I said that, i will post a short tutorial about it. Actually, i was too busy on my clients projects, and finally got a chance to write about adding mix.com badge to your WordPress blog.
If you’re WordPress user then must know about Jetpack plugin which allowing huge features in one solution. It has a great feature to add sharing buttons in WordPress websites. But there missing Mix share button which is really a big problem. If you’re using any other social sharing plugin except Jetpack then most of them already adding mix share button. But Jetpack sharing not updated with mix badge.
So it’s much better if you reduce using another plugin for that specific thing. That’s why I suggest that sharing buttons included with Jetpack so why you use others?
![]()
Add Mix.com Badge with Jetpack Sharing:
If you’ve little knowledge on WordPress then I don’t think that following step will be complicated for you. Just follow the step by step and get it done!
1. Download an icon for Mix.
16×16:![]()
30×30:![]()
2. From your WordPress dashboard, click Media > Add New.
3. Upload the icon and copy that media URL.
4. Now, got to Dashboard > Settings > Sharing. You should now see a page similar to this:
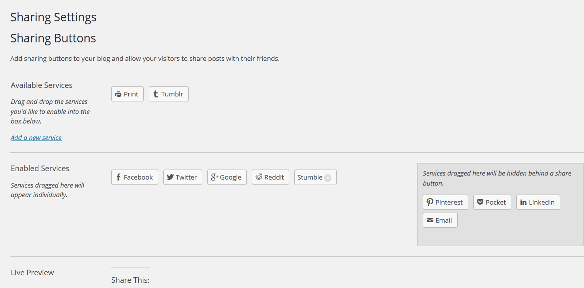
5. Click on Add a new service. You will see a dialog box like this:
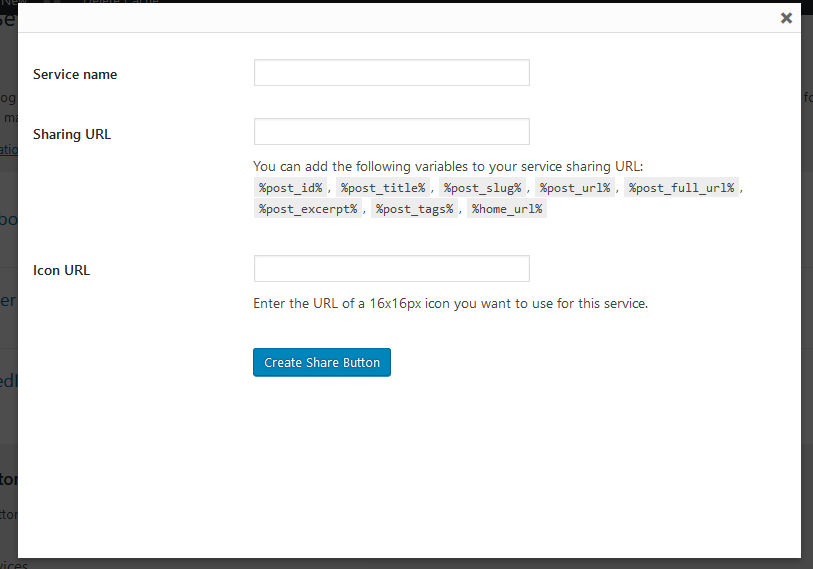
6. Input the Service name: Mix
7. Copy and Past the Sharing URL:
8. Paste Mix icon URL – this is the one you should have copied earlier. (Although, it’s saying 16x16x icon. Still you can use 18×18 icon i added on top)
9. Click on Create Share Button. This will close the dialog box and return you to the settings page.
10. Drag and drop the new Mix share button from the Available Services section down to Enabled Services.
11. Scroll to the bottom of the Jetpack Sharing Settings page and click Save Changes.
Great! You’ve added the mix share button to Jetpack.
Btw, Still you’ve issue on adding mix share badge?
Don’t worry! I will help you to add it on your website. Just drop a comment about your issue, i will get back to you.
Conclusion
I hope you’re happy now to have mix share badge on your website. It will be really good to inspire me, if you share this tutorial to mix and other social networks.