Do you want to enable RSS feed subscription in Blogger?
Best Blogging Tools 2026
Starting a blog? The table below provides a quick overview of the best blogging tools to boost productivity, streamline your workflow, and drive more traffic in 2026.
| Tool | Use Of | Free Version | Pricing |
|---|---|---|---|
| Semrush | Keyword research, SEO analytics, and competitive insights for content growth | ✔ Yes | $165.17/mo |
| Jasper | AI-powered content generation and writing assistance | ✖ No | $59/mo |
| Grammarly | Grammar, spelling, and style checking for polished writing | ✔ Yes | $12/mo |
| Canva | Easy graphic design and visual content creation | ✔ Yes | $12.99/mo |
| Leadpages | Creating high-converting landing pages and lead generation funnels | ✖ No | $37/mo |
If you want to allow readers to read your blog in a feed reader such as Google Reader or Aggregator, you must have to enable RSS feed subscription. Blogger allows you to control how much of each post is shown in the feed reader. In this short tutorial I’m going to share how to enable RSS feed Subscription in Blogspot websites.

What is a feed?
The term “feed” is used to describe an XML document published by many blogs that contains a list of recent posts and entries made to the blog that publishes it. This document can be read by other blogs as well as applications called “feed readers” or “feed aggregators” in order to automate the process of syndicating your blog’s content or for generating links to your blog.
Visitors to your site can subscribe to your syndicated site feed (your RSS feed) in a desktop or web-based news aggregator. This allows your visitors to automatically know when you’ve updated your site and to read your content in a variety of different applications.
Enable RSS Feed Subscription in Blogger
- Log in to Blogger.com in any Web browser.
- Choose Your Specific Blog Dashboard and Click on the “Settings” option.
- Click the “Full,” “Short” or “Until Jump Break” option in the Blog Posts Feed drop-down menu. The option you choose determines how much of each post will be shown in the RSS feed reader.
- Click on the “Save Settings” button at the bottom of the page to enable RSS feed subscriptions.
Change RSS Feed Settings in Blogger
To enable or disable the site feed(s) for your blog, first go to your desire blog dashboard, Settings | Other tab.
Here, you can select how much of your content you want to syndicate. “Full” will put the entire content of each post in your site feed, while “Short” only includes an excerpt from the beginning of each post. Select “Until Jump Break” to show all post content before your jump break. The “None” option turns your site feed off entirely. For more advanced options, you can select “Custom.”
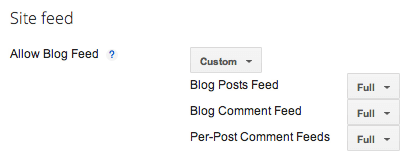
When you select “Custom,” you’ll see options for three different types of feeds. Each option has the same “Full,” “Short,” and “None” setting choices.
- Blog posts: This is the same as the original, “Allow Blog Feed” option.
- Comment feed: This will contain all comments made on all posts on your blog.
- Per-post comment feed: With this option, each individual post will have its own site feed, containing only its own comments.
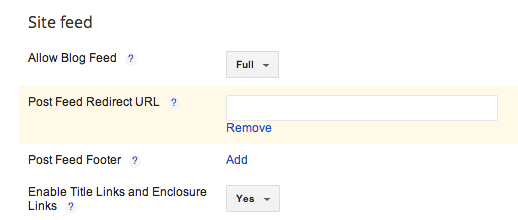
If you’ve burned your post feed with FeedBurner, or used another service to process your feed, you will need to go to your blog’s settings and complete the setup by redirecting your feed. To redirect your feed, just copy and past the feed URL you received from the service into the “Post Feed Redirect URL” section.
Final Thoughts
I think it was a simple tutorial for you and understood clearly. If you’ve further issue about this article just drop a comment. I always keep in touch with my readers so you will get solution. Thanks for sharing this valued post to your social friends!